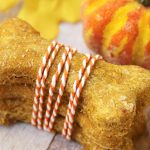
Peanut Butter Pumpkin Dog Treats
Peanut Butter Pumpkin Dog Treats - A crunchy treat made of pumpkin and peanut butter, perfect for your loving fur babies!
Servings: 36
Calories: 40kcal
Ingredients
- 1 cup canned pumpkin
- 2 ½ cups whole wheat flour
- 2 eggs
- 2 tablespoons peanut butter
- ½ teaspoon salt
- ½ teaspoon ground cinnamon
- 1 tablespoons water
Instructions
- Preheat oven to 350 degrees Fahrenheit.
- Mix all of the ingredients together with a spoon or spatula until well combined.
- If the dough seems real dry yet, add a little water at a time until you achieve a dough-like consistency - remember this should be a dryer dough.
- Sprinkle some of the extra flour onto a flat surface and use a rolling pin to spread the dough out.
- Bake for 35-40 minutes.
Notes
- Use Natural Peanut Butter: When selecting peanut butter for your dog treats, opt for natural varieties without added sugars, salt, or xylitol, which can be toxic to dogs. Natural peanut butter contains only peanuts and possibly a small amount of salt, making it a healthier choice for your furry friend. Be sure to check the ingredient list to ensure it's safe for your dog to consume.
- Adjust Dough Consistency: Achieving the right dough consistency is crucial for making dog treats that hold their shape and bake evenly. If the dough feels too dry and crumbly, gradually add a small amount of water, about a tablespoon at a time, until you achieve a dough-like consistency. Remember that the dough should be on the dryer side to prevent it from becoming too sticky or soft during baking. Conversely, if the dough is too wet, you can incorporate a bit more flour to balance the moisture.
- Monitor Baking Time: Keep a close eye on the treats while they're in the oven to prevent them from over-browning or burning. Baking times can vary depending on factors such as oven temperature and the thickness of the treats. Start checking for doneness around the 30-minute mark, and continue baking until the treats are firm and golden brown. Be mindful that the treats will continue to firm up as they cool, so it's okay if they're slightly soft when you remove them from the oven. Allow the treats to cool completely before serving them to your pup.
Nutrition
Calories: 40kcal | Carbohydrates: 7g | Protein: 2g | Fat: 1g | Saturated Fat: 0.2g | Polyunsaturated Fat: 0.3g | Monounsaturated Fat: 0.3g | Trans Fat: 0.001g | Cholesterol: 9mg | Sodium: 40mg | Potassium: 53mg | Fiber: 1g | Sugar: 0.4g | Vitamin A: 1073IU | Vitamin C: 0.3mg | Calcium: 7mg | Iron: 0.5mg